
Want A Stronger Back and Bum? Try The Pilates Bridge Exercise
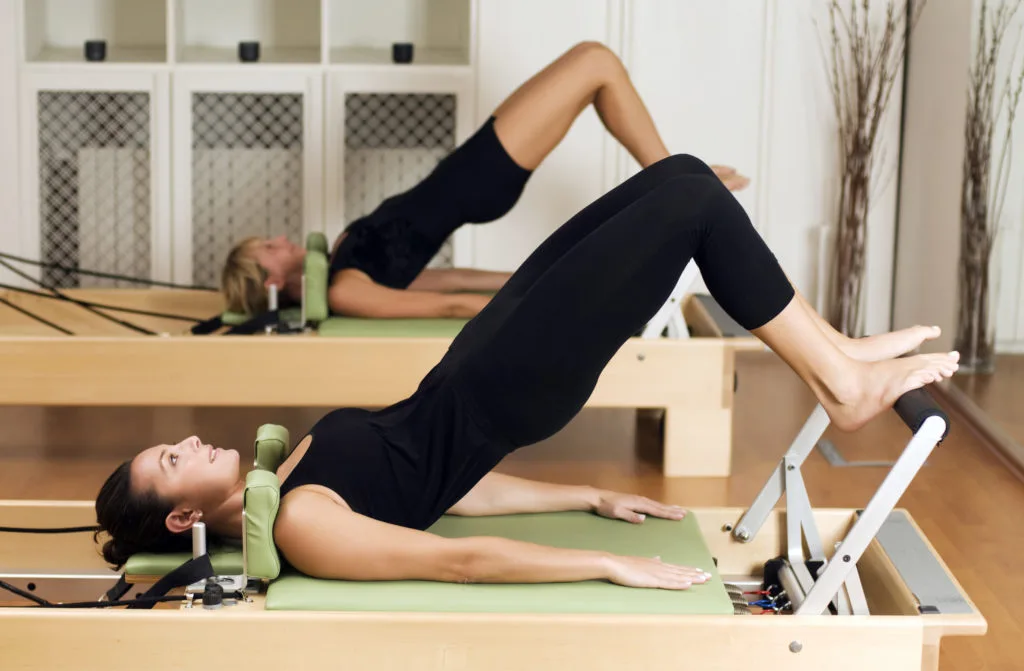
The basic Pilates bridge is one of the best Pilates exercises out there. It is an exercise we give to almost all of our clients in Complete Pilates classes.
This is because it is simple to perform, easy to modify and suitable for most people. It is also a brilliant exercise for building strength, improving spinal mobility and supporting rehabilitation after injury.
The bridge targets some of the key muscle groups that often become weaker or less active because of modern sedentary lifestyles. These include the glutes, hamstrings and spine extensors. It also helps open the front of the hips, which can become tight from sitting for long periods.
This makes the bridge a great addition to a pre-gym activation routine, a Pilates class, a rehab programme or a circuit-style workout. For many people, it is already a regular part of their fitness routine.
However, although the bridge looks simple, it is often performed poorly. If you want to get the full benefits of bridging, you need to do it well. A well-executed bridge should feel controlled, spacious and strong. It should not feel like you are hanging in your lower back or pushing up into your neck.
Want to learn how to perform it correctly so you can build stronger glutes, improve spinal mobility and avoid overloading your back? Here is how to do the basic Pilates bridge.
How to do The basic Pilates bridge
Equipment:
- A Pilates mat
- Optional: a block, step or low chair
Starting Position:
- Come to lie on your back with your knees bent and your legs hip-width apart. If you are doing a bridge with elevated feet then place your feet on the block, step or chair now.
- Knees should be bent at about 90 degrees.
- Arms are straight and down by your sides.
- Your pelvis should be in a relatively neutral position. This means that your pelvis and bum is neither tucked under (so that your back is flat) nor is it duck-like and sticking out.

The Exercise:
- Take a deep, full inhale and create space in your spine by imagining it lengthening.
- Then start to exhale slowly through an open mouth (rather than pursed lips or out through your nose). Breathing in this way aids the movement of your spine.
- As you do so, press into your feet and start to peel your spine up into the bridge position. Reach long through your thighs and let your knees move away from your head – you should feel the front of your hips opening up as you do so and your glutes start to work.

- Make sure those glutes/hamstrings/spine extensors are kicking on by sending your tailbone to the back of your knees and by pulling your heels towards your bum.
- Only bridge up to the point where your shoulder blades are resting on the mat.
- Pause at the top of your bridge and take an inhale here. Or you can stay at the top of your bridge a little longer to build up some strength.

- Exhale and slowly start to bridge back down.
- To initiate this part of the movement, first allow your chest to soften. Then allow the rest of the spine to trickle down segmentally to the mat.
- Keep reaching through your thighs even as you come down. This will create length and space in your body, and therefore helps to decompress your spine.
- Your bridge is complete when your body is back resting on the mat with your pelvis in neutral.
- Repeat 5 – 10 times, or more if you are stronger. Focus on maintaining good form throughout.
Top Tips:
- Back pain whilst bridging? This is a sign you’re not quite doing it right. Make sure you’re not hanging in your lower back while in your bridge and instead really focus on sending your tailbone to the back of your knees.
- Don’t come up too high onto your neck. Remember to keep your chest area soft and your collarbone wide even when your hips are lifted.
- Press into both feet evenly as you move through your bridging so that both legs are equally engaged.
Should Be Avoided or Modified By:
- People with neck pain or neck problems – reduce your range of movement and don’t bridge up so high.
- People with hamstring weakness – keep the number of repetitions low to begin with and slowly build up as you gain more strength.
- People with knee pain – take feet further away from your bottom so that they are no longer bent at 90 degrees.
Variations:
- Keep your spine on a mat but use a block to elevate your feet. This can be used to make the exercise more challenging. At the same time, bridging with your feet flat on the floor can feel subtle and this might make it difficult for you to find the segmental spinal movement we are after. A more exaggerated movement through a bigger range can therefore be a bit easier as you start to build better body awareness.
- If your legs naturally want to drop out to either side as you bridge, pop a soft ball between your knees.
- Legs dropping inwards? A band or Pilates ring around the outside of your thighs for you to press outwards against can be helpful.

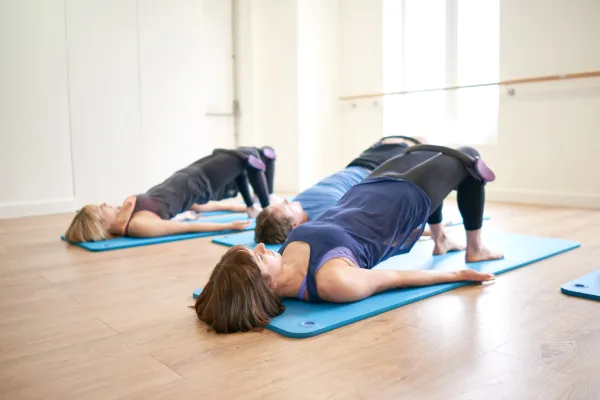
Modify your bridge with a band around your thighs
What Our Experts Say
Bridging is one of those exercises that can be adapted for lots of different people. It can help strengthen the muscles around the hips and trunk while also encouraging controlled movement through the spine. The important thing is to choose a version that suits your body — a bigger bridge isn’t necessarily a better bridge, particularly if you’re working with back pain or reduced mobility.

Benefits:
The basic bridge is great because it strengthens, stabilises and mobilises the body all at the same time!
Bridging strengthens the posterior chain of the body, which means the glutes, hamstrings and spine erectors all get a good work out during a bridge. It also increases hip flexor length and improves hip extension. These are often inhibited/shortened thanks to the hunched-over-the-computer posture we are in most of the time. This means that bridging is a great exercise for people who want better posture. It is especially beneficial for desk-bound office workers.
On top of all that, the bridge exercise helps with the activations of local stabiliser muscles, better body awareness and aids relaxation.
Regular bridging also improves spine mobility, including in the often-stiff area of the mid-spine (see our post to understand why we need a mobile mid-spine).
The latter benefit might not be very well-known, but bridging is really effective when it comes to developing a stable and flexible spine. This is important because having a strong and mobile spine reduces your risk of sustaining back injuries. Creating more movement throughout the spine can also help rehab existing spinal problems.
Gripping and over-tensing muscles can be a big problem for people suffering with injuries. Bridging can help with this by decreasing muscle guarding. This is another benefit not many people are aware of. And is yet another reason why bridging should be practised by pretty much everyone!
Key Takeaways
- The Pilates bridge is simple but highly effective, helping to strengthen, stabilise and mobilise the body.
- It targets the glutes, hamstrings and spine extensors, which are often underused because of prolonged sitting.
- Good technique matters, as bridging poorly can place unnecessary load on the lower back or neck.
- The bridge can improve spinal mobility and hip extension, making it particularly useful for desk workers and people with stiff hips or backs.
- It is easy to modify, making it suitable for many people, including those recovering from injury or building strength gradually.
Join the newsletter
Good news stories, exercise tips and short classes. One email a month.
Conclusion
The basic Pilates bridge is one of the most useful exercises you can add to your movement routine. It strengthens the back of the body, improves hip extension, encourages spinal mobility and helps develop better body awareness.
Although it may look simple, technique is important. A good bridge should feel controlled, strong and spacious, not strained through the lower back or neck.
Whether you are using it as part of a Pilates class, a rehab programme, a warm-up or a home routine, the bridge is a brilliant way to build strength and improve movement quality.
Feeling Inspired
If you want to experience the Complete difference and discover the benefits of one-to-one or small group Pilates, book a session at one of our London or Norfolk studios today. Not able to make it to one of our studios? We've got online options to suit you anywhere, anytime.
Our physiotherapist-led Chelsea Pilates studio, our Angel Pilates studio, our Pilates studio in London City, and our Norfolk Pilates studio in East Anglia, offer a highly tailored approach to your Pilates training. Whether your goal is to manage a health condition, rehabilitate from an injury or to improve your strength and fitness, Complete Pilates is the studio for you.
Education is key
These blogs are designed to give information to everyone, however, it is important to remember that everyone is different! If you have not seen one of our therapists and have any questions about injuries, what you have read or whether this may be useful to you, please just ask. We are more than happy to help anyone and point you in the right direction. Our biggest belief is that education is key. The more you understand about your injury, illness and movement, the more you are likely to improve.
If you are not sure whether this is for you, simply get in touch. We are here to help!
FAQs
What muscles does the Pilates bridge work?
The Pilates bridge mainly works the glutes, hamstrings and spine extensors. It can also help activate the deep stabilising muscles around the pelvis and trunk. Overall, think about it mainly working the back of your body and your trunk.
Is the bridge good for lower back pain?
The bridge can be helpful for some people with lower back pain when performed correctly. It can improve glute strength, spinal mobility and pelvic control. However, if it increases pain, the range or technique may need to be modified. Of none of our top tips help, make sure to seek advice from your physiotherapist as this should not be the case.
Why do I feel bridging in my lower back?
If you feel the bridge mainly in your lower back, you may be lifting too high, over-arching your spine or not using your glutes and hamstrings enough. Try reducing the height and focusing on sending your tailbone towards the backs of your knees. Your body should run in a straight line from shoulders to knees. If you cannot see your pubic bone, you are probably arching your back too much to achieve your hip extension. Instead try working from a step so that you have more room to move.
How many bridges should I do?
A good starting point is 5–10 repetitions with good control. You can build up gradually as your strength and technique improve. If you are doing these bodyweight, you are likely going to be physically able of doing a lot. of repetitions. Know what your aim is and if you are finding you have good technique, try adding more weight or trying one of our variations. If you are looking for more mobility, add a step and work through a larger range of motion.
How can I make a bridge harder?
You can make a bridge harder by elevating your feet, holding the top position for longer, adding a band around your thighs or progressing to single-leg variations. Only progress once you can perform the basic bridge without any discomfort. If you want a further challenge you can also add weights to your hips and the movement.
Published 20 Sep 2023 · Updated 18 Sep 2026